|
|
|
|
When creating an Expense Report, each detailed item must belong to a predefined Expense Type. This screen can be used to create additional expense types to meet the needs of your organization. When creating expense types, you can associate them with one of the several built-in expense wizards. When entering expenses against an expense type that is associated with a built-in wizard, an additional popup screen will display to capture additional details specific to that type of expense.
Twelve expense types will be included with the default installation (these can be removed or modified per your needs), including:
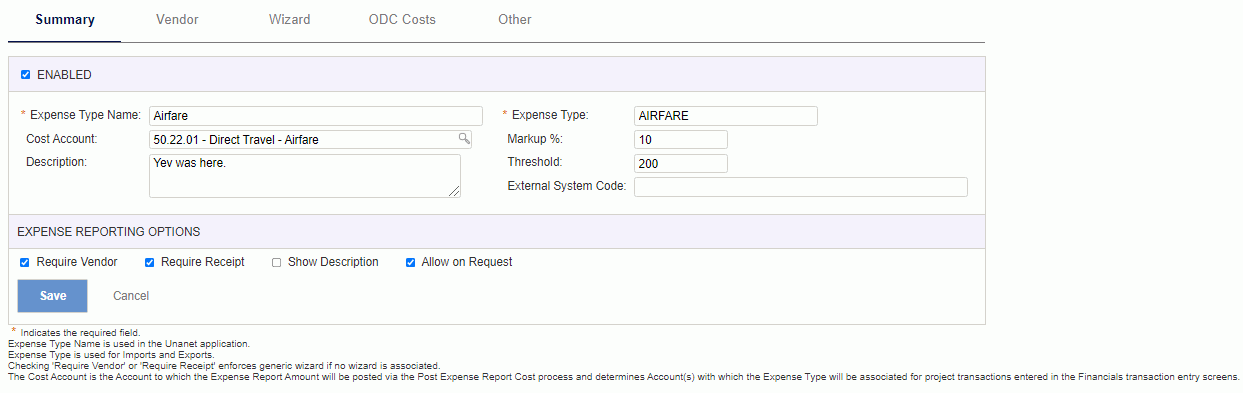
Note that while the Expense Type field is the key value, the Expense Type Name is what appears in the various drop-down selection boxes and is included in report output. Both values must be unique across all entries and the Expense Type remains the key value used when importing expense data.
This screen is available to users having any of the following roles: Administrator and P&R Administrator
This screen is available with the Project Expense, Project Tracking, and Project Portfolio family of Unanet licenses.
Topics covered on this help page include:
Add and Edit Expense Types (you can also disable expense types)
Other tab (if you have expense type user defined fields enabled, this tab will appear)
You may also be interested in:
FAQ - Can I change an Expense Type's Wizard after an expense has been charged to it? (search for this topic in the Knowledge Center)
Quick Topic - Unallowable expenses as non-billable (search for this topic in the Knowledge Center)
The list screen will display the complete list of all active and inactive expense types defined in your system.

|
|
|
You cannot delete an expense type if it has been used on any expense report or mapped to a Cost Structure ODC.
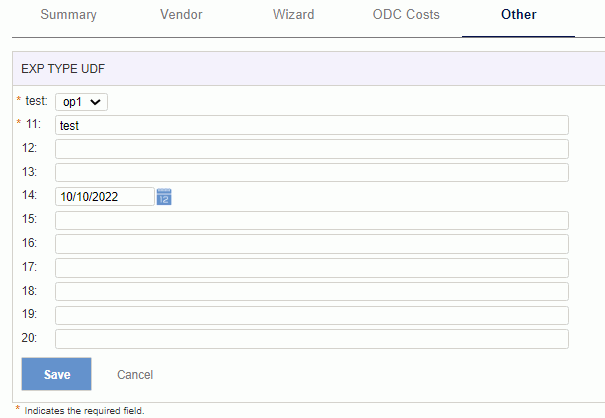
The Expense Type entity has 20 user defined fields that can be activated if additional fields are required. When enabled, they will appear in an additional "Information" column on the far right of this expense type listing.
To add a new expense type, you will need to supply at a minimum the Expense Type Name and Expense Type (code) on the Summary tab. The remainder of the fields on the summary tab and the remaining tabs are all optional.
The expense type name is the name that will appear in all of the drop-downs throughout the product. The expense type value (which could be considered an expense type code) is the value that is intended to be used when importing and exporting data to and from Unanet. This field exists for backwards compatibility. Both fields must be unique across the system.
|
|
|
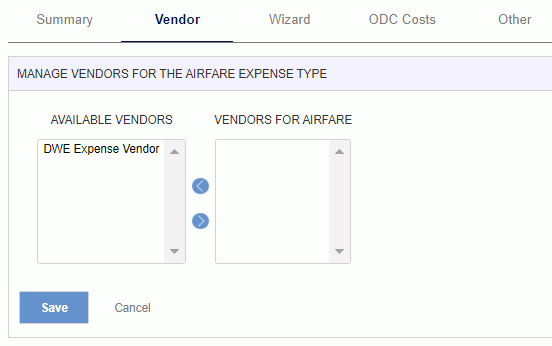
When defining an expense type, you can pre-define the list of vendors that are to be associated with that expense type. When a user is entering his/her expenses, the user will see the associated vendors in the drop-down list on the expense wizard.
All available vendors created in your system will appear in the window on the left and the vendors you have associated to a particular expense type will appear in the window to the right. Use the blue left and right arrows to assign vendors to or unassign vendors from an expense type.
Before you can associate a Vendor with an expense type, you must first create them via the Admin >> Setup >> Expense Vendors screen.
|
|
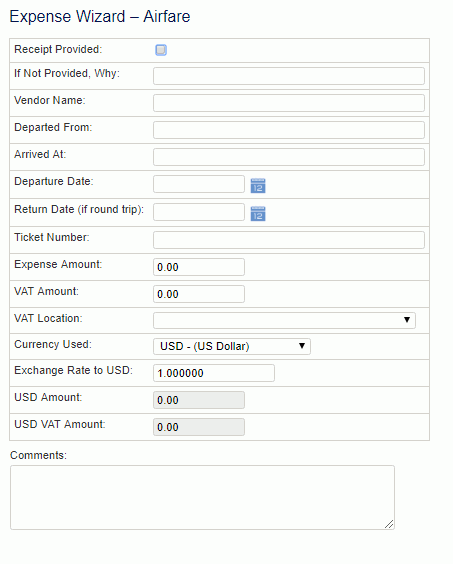
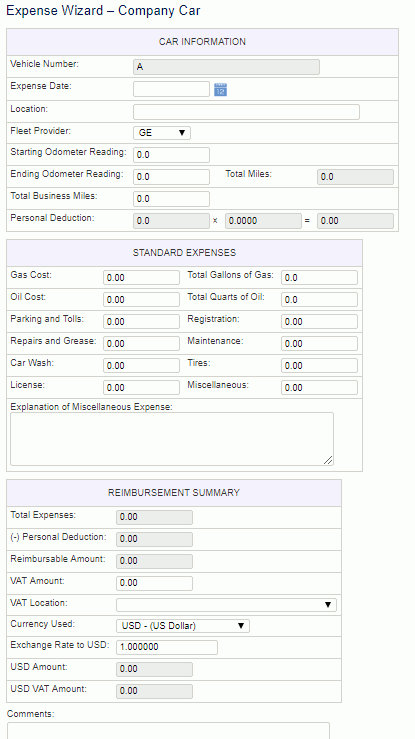
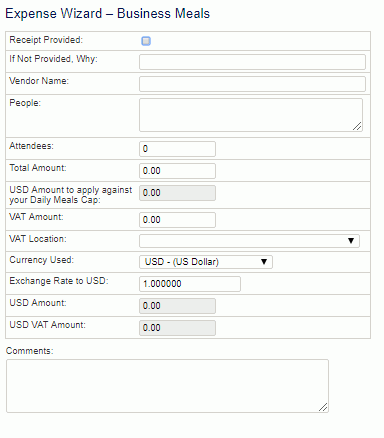
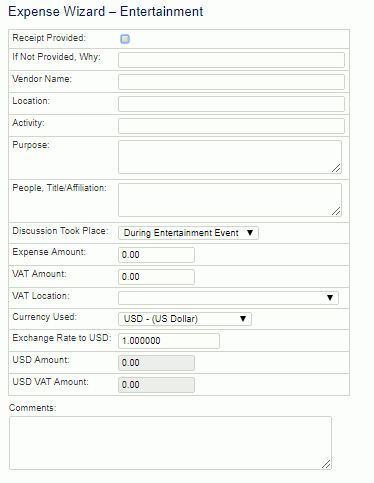
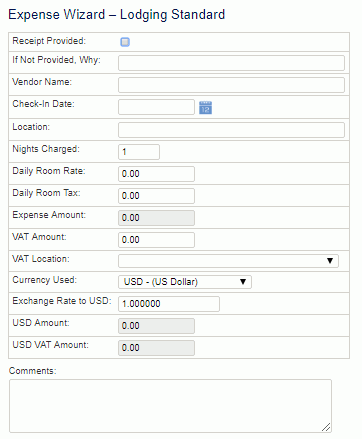
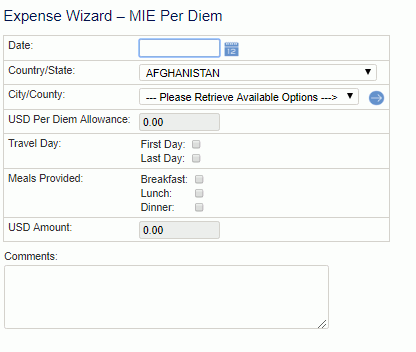
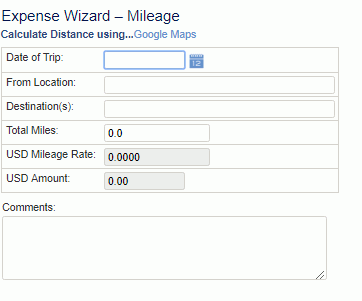
When defining expense types, you have the option of associating an expense type with one of the built-in wizards.
A wizard is a popup screen that will appear when a user is entering an expense report line item and they click on the amount field. Rather than entering an amount directly on the expense report detail screen, the user will capture a number of additional details regarding the expense and the amount will be calculated in the wizard and transferred onto the original line item after clicking Save on the wizard screen. The user can also popup a wizard when on the expense report detail screen by clicking the wizard icon. The additional details captured on the wizard will appear in the preview version of the expense report in the Comment section.
Note: The Wizard Message (unasense.wizard.message) property can be used to display a standard message on the top of all wizard popup screens.
To associate an expense type with a particular wizard, select the wizard type on this tab and hit save.

For an example of each wizard or further description of the fields on each wizard, expand the sections below.
There is also a generic wizard, which can be used on any expense type that is not explicitly associated with any other wizard. This may be useful if you need to record an expense using a currency other than that of the system's base currency. For those expense types that are not associated with a built-in wizard, the user would need to click on the wizard icon on the expense report line item to launch the generic wizard.
You can update an expense type changing the associated Wizard type so long as no expense actuals have been charged to that expense type.
That is, once actuals have been charged against that expense type, you can no longer change the wizard type association.
Wizard Details
For certain wizards the lower portion of this screen may change, displaying additional configuration options that you will need to define.
Mileage & Company Car Wizards - Additional Wizard Details
When configuring an expense type that will be associated with the mileage wizard, the lower portion of the Wizard tab will display an additional section. In this section, you will need to indicate which mileage rate set to associate with this expense type. Mileage rate sets are defined via the Admin >> Setup >> Mileage Rate Set screen.
The mileage rate set associated with an expense type using a mileage wizard can be changed even after expense actuals have been charged to this expense type. This relationship is used at a point in time to provide a rate which is then stamped with the expense actuals, thus allowing for this type of change.
Expense Types associated with Mileage and Company Car wizard will display the name of the Mileage Rate Set associated with that expense type under the Expense Type Name, in the expense type list.

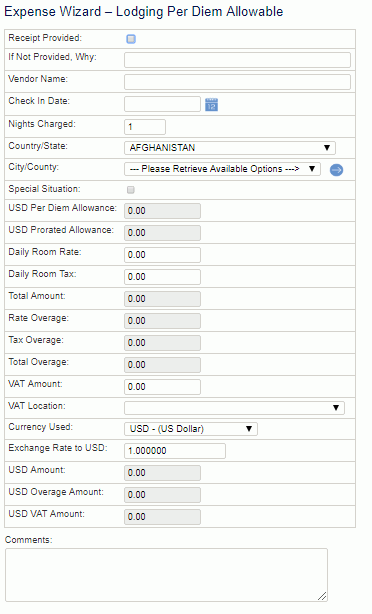
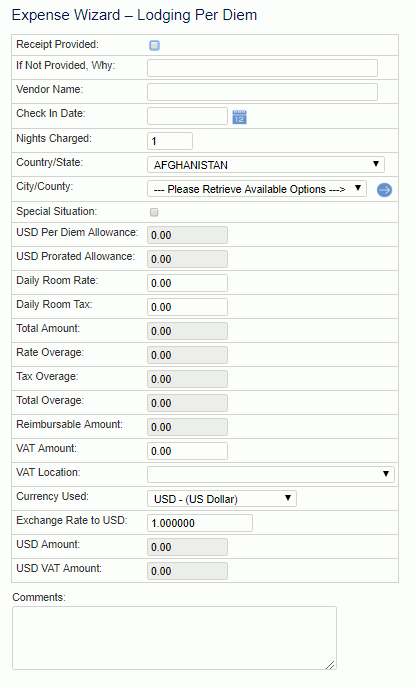
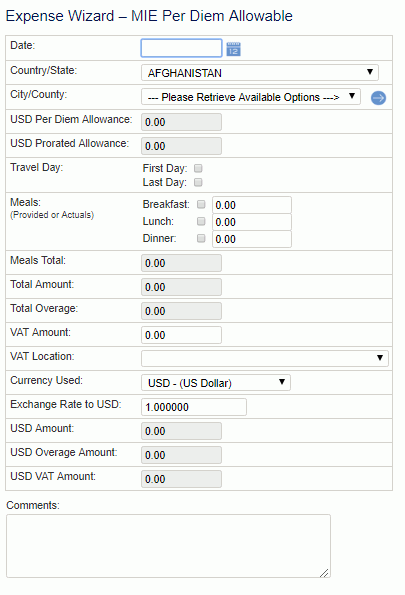
Lodging Per Diem and M&IE Allowable Wizards - Handling Overage Amounts
When configuring an expense type that will be associated with a Lodging Per Diem or M&IE Allowable wizard, the lower portion of the Wizard tab will display an additional section. In this section, you can optionally configure the system to record any expense overages (as calculated by the Lodging Per Diem or M&IE Allowable detail wizards) in a separate expense report line item (having a different expense type). You would use this lower section of the screen to indicate which expense type to record the overage against.
Note that:
Expense Types having their overage automatically captured in a separate expense report line item/expense type, will display the name of the expense type that the overage will be recorded against under the Expense Type Name in the expense type list (e.g., Overage recorded in xyz expense type).
Expense Types used to record overages automatically will display an indicator that it is used to record Overage under the Expense Type Name. Also note that you cannot disable one of these overage expense types if the expense type it is related to is active (you must first disassociate it as being an overage expense type).
You can modify an expense type, unchecking the Record Overage check box, even after it has been used to record expense actuals. Any existing expense reports will not be immediately effected by this change. Any new expense line items added, as well as any further modification to existing Lodging Per Diem or M&IE Allowable wizards would reflect the change (and thus, would not automatically generate the associated line item reflecting the overage amount).
For expense types identified as being used to record overages, the Vendor Required and Receipt Required check boxes will be reset to an unchecked state.
The expense types available to record overage amounts include those expense types that:
are not already associated with any built-in wizard type
are active
do not have any actuals already charged to that expense type

Overage Expense Type
When you have enabled the feature to capture an overage amount in a separate but related line item, whenever a user creates an expense line item having the Lodging_Per_Diem or M&IE Allowable wizard, a related child record having the designated overage expense type will be created, reflecting the overage amount (as calculated by the Lodging Per Diem wizard).
The overage record will not be created for those projects that have project level expense types defined which exclude the overage expense type.
Note that on the overage child record, only the "Charge To Project" and "Project Type" fields are editable.

Removing the child record from any related expense line item is allowed, however, each time the expense type having the Lodging Per Diem or M&IE Unallowable wizard is re-saved the child record will be re-created.
When viewing preview versions of these expense reports, these expense type line items will be paired.
Note that you cannot manually create expense line items for expense types designated to capture overage amounts. They are only generated by the system in concert with the Lodging_Per_Diem and/or M&IE Unallowable wizard functionality.
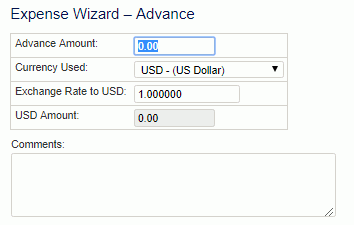
The system comes with two pre-defined expense types, Advance and Cash-Return (these are indicated by System Defined in the Wizard column on the expense type list). You cannot delete either of these expense types, however, you can disable them if you do not want them available in your system. These expense types should be used with reimbursable payment methods.
Not Available throughout product
These expense types are different than other expenses in that they represent an exchange of monies between the expense user and the company as opposed to an actual expense incurred by the company. As such, these expense type entries will not appear throughout the product along with other expenses.
They will appear and be available for expense users to make entries when entering an expense report. They are also available when exporting expense related data as well as when configuring the Admin >> Setup >> Employee Type >> Expenses. They will not appear nor be available when entering expense plans and budgets, nor are they available when viewing expense related reports.
Important! When entering an expense report line item having an expense type of Advance, the payment method specified should be configured as reimbursable (as these values should always result in a modification of the amount due the employee rather than the accrual of another expense payable by the company).
Advance
The purpose of the Advance expense type is to allow users to record monies that were provided to them prior to incurring an expense or taking a trip. The amounts entered against the Advance expense types will be deducted from the total Reimbursement amount of the Expense Report. Note that the amount will be displayed in (red) and in parentheses, for example, if you record an Advance of $100.00, the detail line on the Expense Report preview page will look like this: ($100.00).
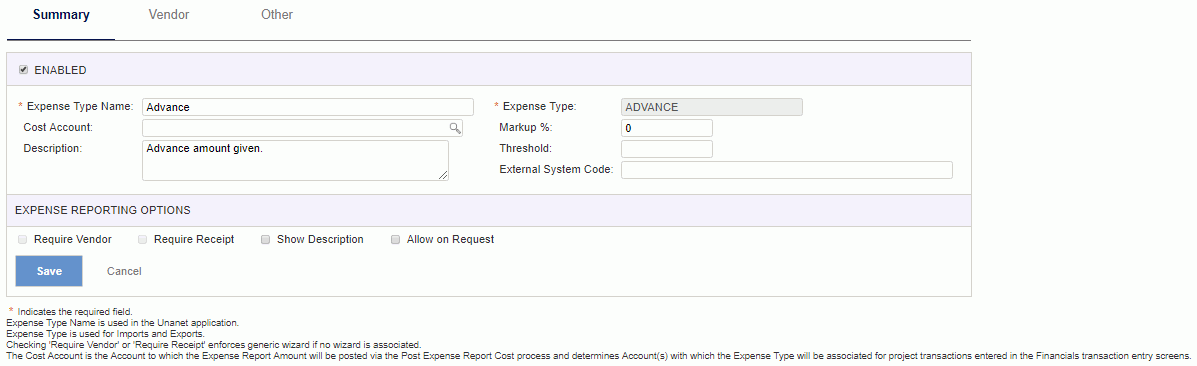
Note that unlike other expense types, you cannot modify the provided expense type value (it will always be referred to as Advance). Further, when editing this expense type, you will notice that you cannot define an associated Wizard (the Wizard tab is hidden).
When entering an advance expense line item, you can directly enter the advance amount. However, if you do click on the wizard icon, the advance wizard will look as follows:
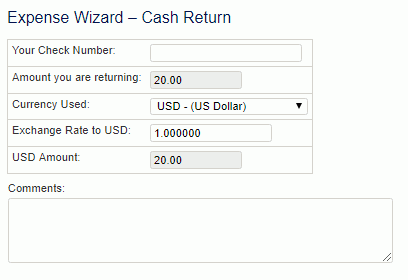
Cash Return
The purpose of the cash-return expense type is to provide the user with the ability to record any leftover amount they may have received as an advance but did not spend. This amount is being returned and thus is used to reduce the effect of an advance amount (that is, the reimbursement total would reflect the original reimbursement amount minus the advance plus the cash-return).
Important! When entering an expense report line item having an expense type of Cash-Return, the payment method specified should be configured as reimbursable (as these values should always result in a modification of the amount due the employee rather than the accrual of another expense payable by the company).
You can only use a cash-return expense line item on the same expense report where an advance has been recorded.
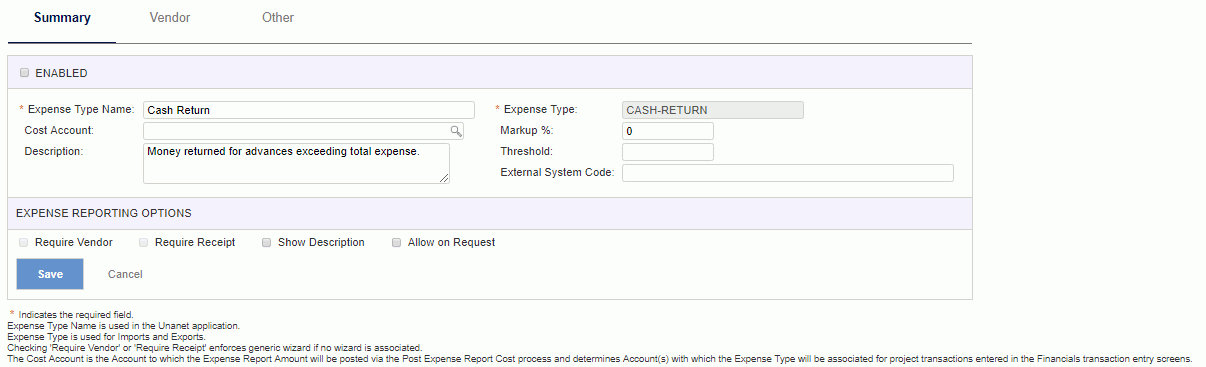
Note that unlike other expense types, you cannot modify the provided expense type code value (it will always be referred to as CASH-RETURN). Further, when editing this expense type, you will notice that you cannot define an associated Wizard (the Wizard tab is hidden).
When entering a cash-return expense line item, the wizard will look as follows:
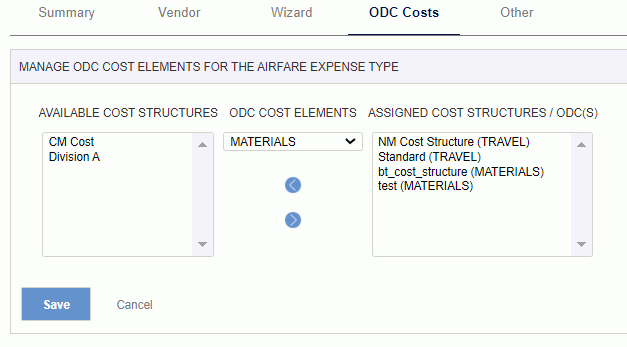
This tab allows for mapping expense type to cost structure and ODC cost elements.
All available cost structures will appear in the window on the left and the cost structures you have associated to a particular expense type will appear in the window to the right. Use the blue left and right arrows to assign or unassign cost structures to/from an expense type.
If Enable Expense Type Unmapped Warning (unasense.expense_type.unmapped.warning) property is set to "Required", then you must map at least one cost structure/ODC cost element to the expense type. If it is set to "Warning", you will be able so save the expense type without mapping a cost structure but you will see a warning displayed. The default setting is "Warning".
The Expense Type entity has 20 optional user defined fields that can be activated if additional fields are required. When enabled, they will appear in an additional tab (Other). If none have been activated, then this tab will not appear.
The Expense Types >> Accounts screens are available to associate Account Categories to accounts or accounts to the combination of expense type/project types, to be used during a variety of posting activities Whether the Account values you specify on these screens are utilized during the posting procedures will depend on which Posting Group the project being processed is associated with, assuming the activity is project related. Project Posting Groups are designated on the Project Profile >> Accounting tab.
When clicking on the ![]() or
or ![]() icons in the Expense Type List, you will be presented with a popup menu containing options for "Cost Account" and "Posting Group Account".
icons in the Expense Type List, you will be presented with a popup menu containing options for "Cost Account" and "Posting Group Account".
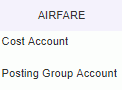
Cost Account
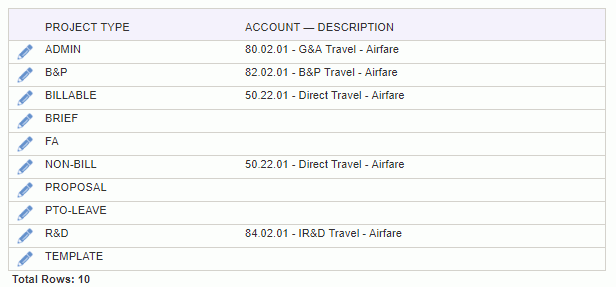
Clicking on the Cost Account option will allow you to configure a specific Account for a particular Expense Type / Project Type combination. Note that you can manage the accounts for this combination either via the Expense Type account screen or via the Project Type account screen (both screens update the same physical entities).
Using the pencil icon, you can edit project type entries and associate or remove an existing account. The list of Project Types on this screen include all Project Types defined on the Admin >> Setup >> Project Type screen (active or inactive). The list of accounts that may be associated is maintained on the Admin >> Setup >> Accounts screen.
The account defaulting for Expense Report Cost Accounts behaves as follows. If an account is specified for the Expense Type / Project Type combination, it will be used. Should that not exist, the account from the Expense Type will be used. Should that not exist, the default account specified for the Expense Report Cost account category will be used. If none of these exist, an error will occur.
Posting Group Account
Clicking on the Posting Group Account option will allow you to configure a specific Account for a particular Account Category. Using the pencil icon, you can edit account category entries and associate or remove an existing account. The list of available Account Categories that can have expense type specific Accounts specified is pre-defined in your system. For more information about Account Categories, see the Account Category Descriptions topic.

|
|
The meal cap feature allows you to specify a threshold amount that spans several expense types. For example, you could set up three customer expense types called Breakfast, Lunch and Dinner, and via the meal cap feature, you could set up a daily amount threshold that would be flagged if the amount was exceeded (for expenses charged to all three of these expense types).
This feature enables the display of a red flag and does not prevent the save or submittal of an expense report. The red flag will appear for the end user on the editable expense report as well as the preview version for users and approvers.
See Meal Cap (unasense.meal.cap) and Include Expense Types in Meal Calculation (unasense.meal.expense_types) for additional information.

 Air
Air