|
|
|
|
The Create Vendor Invoices from Matched Transactions feature is useful for external vendors who need to generate Vendor Invoices (VIs) from Purchase Orders (POs) for their people. The VIs are generated from matched labor and expense report transactions from the related POs.
The VI User role has limited functionality, but allows users with that role to view, edit, add, and delete Vendor Invoices for a given vendor, and access the Vendor Invoice Status report. This role is usually given to someone outside of your organization, like an external vendor.
This process will create a vendor invoice document for each selected PO, having matched labor and expense sections reflecting the matched transactions from the PO. The resulting VI will be in INUSE or SUBMITTED status depending on whether the user selects the submit invoices transaction option on the Search page. Users can review, refine and post the resulting vendor invoice documents via the standard Vendor Invoice functionality.
Timesheet entries and expense reports eligible to participate in this process include those in a LOCKED or EXTRACTED status that have not been previously converted to a vendor invoice.
On this screen, you will supply both Search Criteria (to identify the Legal Entity and matched transactions of interest), as well as supply Transaction Attributes that will be needed during the Vendor Invoice creation process (i.e., AP Org, AP Account, Fiscal Period, etc.). Once the List has been refined and specific items selected for inclusion, clicking the Create Vendor Invoices button will initiate the process.
This screen is available to users having any of the following roles: Administrator, AP User, AP Poster, or VI User. AP Users and AP Posters can only access POs with legal entities to which they have access via their financial org access. VI Users can only access POs with legal entities to which they have access via their financial or vendor org access. See People Organization Access for more information.
This screen is available with the Project Financials family of Unanet licenses.
Topics covered on this help page include:
Search (to refine the list of items to be included and provide creation attributes)
List (to select which items will be included)
Labor and Expense Details Click-thru Report (to view labor and expense report details)
Create Vendor Invoices Process (to generate Vendor Invoices)
You may also be interested in:
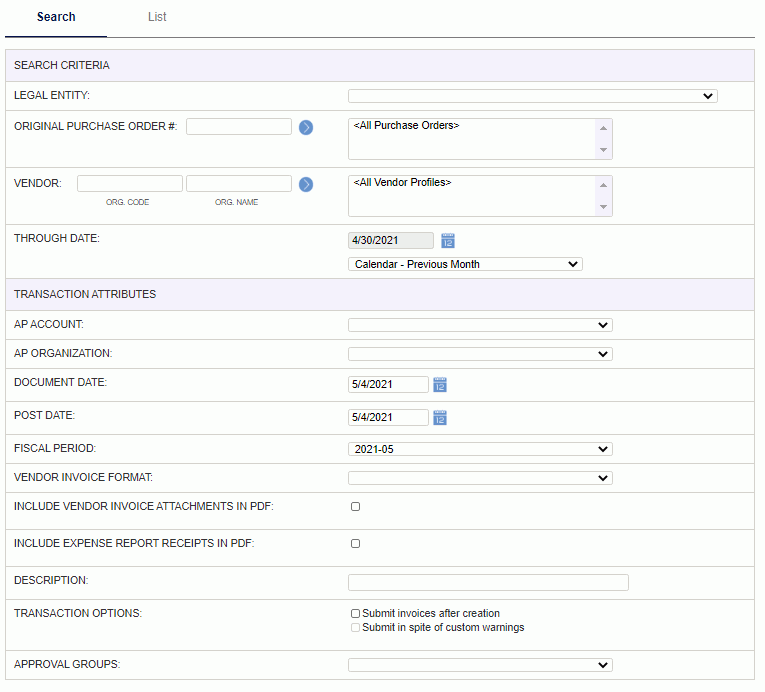
Using the Search screen, you will supply both search criteria and required attributes that will be needed during the Vendor Invoice creation process.
Search Criteria
Legal Entity must be specified, all other Search Criteria is optional.
When changing the Legal Entity:
the AP Account and AP Organization drop-downs are reset to show the accounts and organizations in that legal entity
Transaction Attributes
The following fields in this section are required: AP Account, AP Organization, Document Date, Post Date, and Fiscal Period. Approval Groups is required if Vendor Invoice Require Approvals (approval_process.require.approval.vendor_invoice) property is set to "Requires Approval Always".
|
|
|
The Suppress data preview option on the Search page is selected by default, and the List page will display the following message: “Suppressing data preview. All transactions matching Search Criteria will be processed when Create Vendor Invoices button is clicked.” The data will not be displayed in this case.
However, if you deselect the Suppress data preview option, then the data will be displayed. From the list of available entries, you can check one or many of the entries to include in the Vendor Invoice creation process. Clicking on the checkbox at the top (next to Vendor) will toggle the checkboxes on each row on and off.
After selecting the desired entries, you can click on the Create Vendor Invoices button to initiate the Create Vendor Invoice Process.

The totals at the bottom get updated as you select the POs to include.
|
|
|
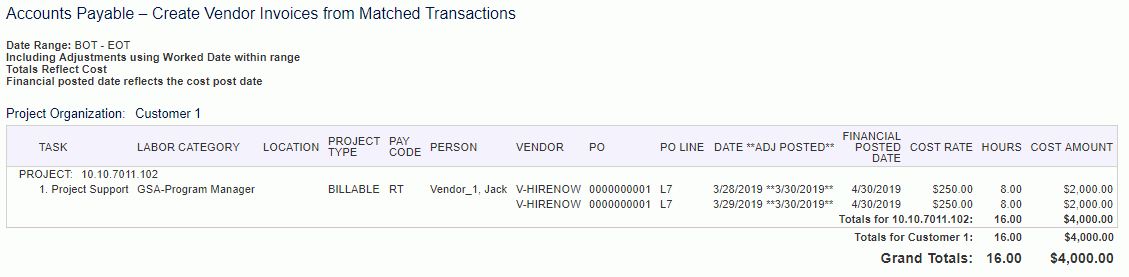
To view labor or expense report details, you can click on the Labor or Expense value in the Matched This Invoice group on the List screen and a popup report will display. This popup report will display all reimbursable amounts for labor or expense belonging to that PO.
Example of labor click-thru report:
Example of expense click-thru report:

Note: The Reference field on the expense click-thru report refers to the reference from the VIs being created, and will always be null.
Once items have been selected on the screen, the process can be initiated by clicking on the Create Vendor Invoices button. The newly generated Vendor Invoices will be left in the INUSE or SUBMITTED status (depending on whether Submit invoices after creation is checked, and whether there were errors), available for further editing or posting.
Standard and custom validations are performed. If Submit in spite of custom warnings and Submit invoices after creation are both checked, the VI will be submitted even if there are custom warnings from the custom business rules or stored procedure (unless there are errors).
Process Description
Process Feedback
As the Vendor Invoices are created, details of each document created will be displayed along with the start and end date / time stamp for the overall process.
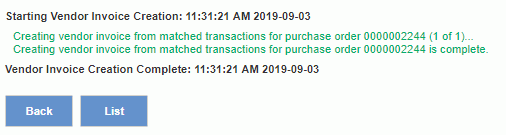
Upon completion of the process, you will have two navigation choices via the available buttons: