|
|
|
|
The Project >> Billing screens are available for the Billing Manager to define various billing attributes that must be established in order for a project to participate in the posting and billing process.
The Billing menu option and screens are available with the Project Tracking and Project Portfolio Unanet licenses. Users must have a Billing Manager role in order to view and manage the screens under this menu item. This menu item will only be enabled for those projects having a Billing Type of FP, CP or TM.
The Billing menu has a number of submenu options used to manage Billing information for a particular project.

Should the Billing Type on a project be updated once established, the entries on these Billing screens will be removed (and reset to the project default settings).
Topics covered on this help page include:
Fixed Price (to define fixed price billing and revenue recognition entries for this project)
When and What can be Edited (to understand which fields can be edited and up to what point)
Import (to insert or delete fixed price billing items via import for this project)
Export (to export fixed price billing items)
Invoice Setup (to define invoice groups, invoice layout and format for this project)
Invoice Groups (to establish whether and how this project may participate in an Invoice reflecting multiple projects)
Contacts (to define the contacts and addresses that will appear on an invoice)
Additional Formats (to define additional formats that may be produced when generating invoices for this project)
Other (to define optional invoice Header details)
Pre-Billed Labor (to define any pre-billed labor for this project)
Project Accounting > Instructional Guide (search for this topic in the Knowledge Center)
Billing > Instructional Guide (search for this topic in the Knowledge Center)
Project Invoice Setup Import (for more information about importing project invoice setup configuration attributes)
Project Invoice Setup Export (for more information about exporting project invoice setup configuration attributes)
Email Invoices - Knowledge Center Topics (search for this topic in the Knowledge Center)
Quick Topic - Methods for Forecasting Fixed Price Revenue (search for this topic in the Knowledge Center)
Method 2 - FP Revenue Recognition and Forecasting - "% Complete" (search for this topic in the Knowledge Center)
In order to define Fixed Price items for a project, either the project or a task on the project must have a Billing Type of FP (cost plus projects cannot have fixed price tasks). When defining an entry, you have the option of specifying a specific date the item will have its revenue recognized or you can define a revenue recognition schedule. Items can be billed first and recognized later or recognized first and billed later, or bill and recognized at the same time.
Note that you can also add or delete Fixed Price items via the Fixed Price Import.
See Billing >> Post help for more information about what happens when posting a project having fixed price items.
See Methods for Forecasting Fixed Price Revenue in our Knowledge Center for more information on that topic.
Listing Existing Fixed Price Items
Upon clicking in the Fixed Price menu item, the user is presented with a listing of any existing Fixed Price Billing Items and associated Revenue Recognition entries.
The screen will resemble the following:

|
|
|
Adding a Fixed Price Billing Item (Single Item Entry)
When adding Fixed Price Billing items, you can choose one of two options. You can either add items one by one, using the ![]() icon, or you can use the
icon, or you can use the ![]() icon to generate multiple entries (e.g. a schedule of fixed price items). When using the single item entry "Fixed Price Item" option, you will be presented with a screen that resembles the following.
icon to generate multiple entries (e.g. a schedule of fixed price items). When using the single item entry "Fixed Price Item" option, you will be presented with a screen that resembles the following.
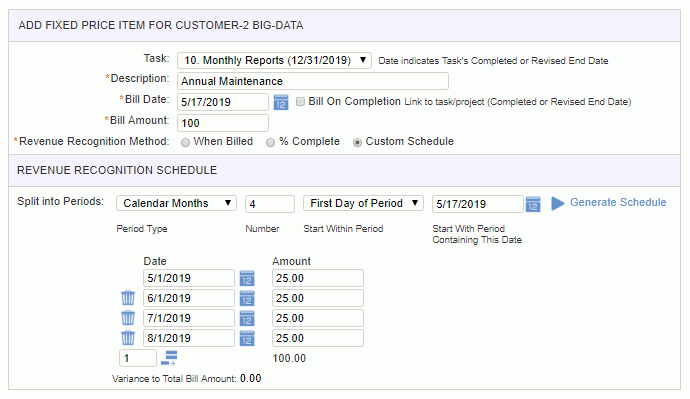
On this screen, you will define which project / task the fixed price item is associated with, along with a description, date and amount of the item. You will also need to indicate when the item should have its revenue recognized.

|
|
Adding a Revenue Recognition Schedule
When the Revenue Recognition Method of "Custom Schedule" option is selected, additional controls become available in the lower portion of the screen to define a schedule of dates and amounts.
When entering a recognition schedule, the total of all recognition amounts must match the fixed price item amount.
When editing an existing fixed price item, if any of the revenue recognition schedule entries have been involved in a posting process, you can no longer use the utility to completely regenerate a new schedule, however, you can continue to modify, add and remove unposted entries so long as the total of the revenue recognition amounts continues to match the fixed price item total.
|
|
|
Adding a Fixed Price Billing Item (Schedule of Items Entry)
When adding Fixed Price Billing items, you can choose one of two options. You can either add items one by one, using the ![]() icon, or you can use the
icon, or you can use the ![]() icon to generate multiple entries (e.g. a schedule of fixed price items). When using the "Fixed Price Billing Schedule" option, you will be presented with a screen that resembles the following.
icon to generate multiple entries (e.g. a schedule of fixed price items). When using the "Fixed Price Billing Schedule" option, you will be presented with a screen that resembles the following.
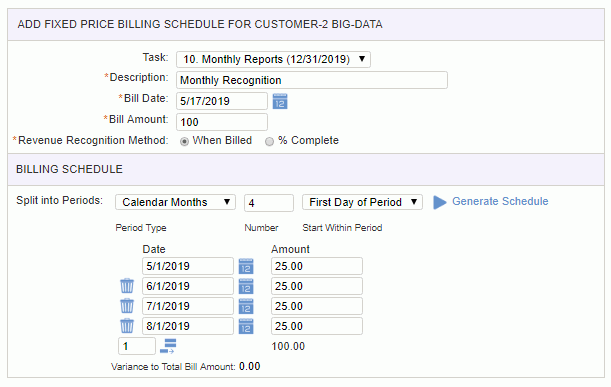
On this screen, you will define which project / task the fixed price item is associated with, along with a description, date and amount of the item. You will also need to indicate when the item should have its revenue recognized. The result of using this screen will be the creation of one to many individual fixed price billing items. This schedule generation screen cannot be used to further modify scheduled entries, but rather is simply an aid when creating the fixed price items.
Note that when you use this option to create the fixed price items, you do not have the option to define a Revenue Recognition Method having a "Custom Schedule". These custom schedules could be added to the resulting fixed price items one by one after they have been created.
|
|
The rules for which fields can be changed and when are below:
Note: the format of the Invoice Date can be controlled via the Invoice Date Format (unanet.invoice.date_format) property.
The project Fixed Price import feature provides the Billing Manager with the ability to load a list of fixed price item into Unanet. The file must be in the current Fixed Price Import csv layout.
Note that this import can be used to insert new records and delete existing records, but cannot be used to update any existing entries. Further, you cannot import fixed price schedules, thus there is no option that corresponds to the "Custom Schedule" option available within the user interface. The project (or Task) must have a Billing Type of FP (Fixed Price) in order to import fixed price items.
Supply the name of the file to be imported and click on the import button. You can also control the level of informational and warning messages that may be returned to the screen.

Warning and error messages are written to the screen. See the Fixed Price Import help page for more information about importing fixed price items.
The project fixed price export feature provides the Billing Manager with the ability to save a csv formatted file containing information about fixed price entries on the current project. The layout of this output file will match the current Fixed Price Import layout.
This feature may be useful if you would like to delete a list of fixed price entries that were previously imported (by exporting the existing entries, modifying the resulting output file to include the !DELETE! flag and then re-importing it), or perhaps to create a list of entries for the purpose of generating a set of similar entries for importing into another project.

On this export, you have the option of including Project level, Task level or items at both levels.
While you cannot import items that were previously posted, you can optionally include posted fixed price items in the export.
Similarly, the import is restricted to importing only those items having a Revenue Recognition Method of "WHEN_BILLED" or "PERCENT_COMPLETE", while the export can optionally include "Custom Schedule" Revenue Recognition entries in the output.
Billing Managers can use the Invoice screen and tabs to define invoice attributes for the current project.
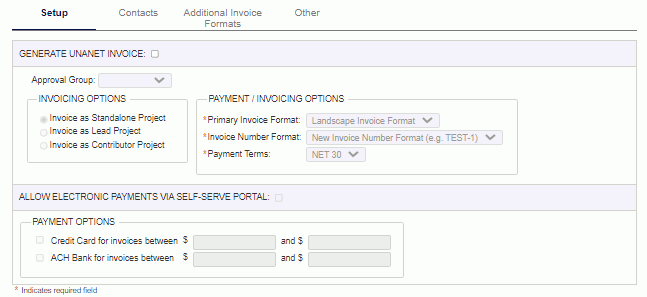
One over arching control on the Setup tab is the Generate Unanet Invoices check box. When this control is not checked, the current project will not participate in the Add Invoices process. Once this item has been checked, a number of other attributes on the invoice setup tabs will be required.
Note that many of the attributes defined at the project level on these tabs can subsequently be modified or removed on individual draft invoices (when adding or editing a draft invoice).
When configuring a project to be available for invoicing, you will need to define whether it is being invoiced as a stand-alone project or whether it participates in an Invoice Group. An Invoice Group is a group of projects that are to be invoiced together. Participants in an Invoice Group include at a minimum, a Lead Project, and optionally additional Contributor Projects. Invoice setup details will be largely determined by the configuration established on the Lead Project and thus many of the setup options will be disabled when editing a Contributor project.
Indicating that a current project is either a Lead Project or participates as a Contributor project can be done when editing either a Lead or Contributor project. While this may not be typical, projects can be moved from one type to another designation. Changing a projects participation in an Invoice Group will only impact the generation of future invoices. That is, should any draft or completed invoices already be generated, they will remain as they were when they were generated and only future invoices will reflect the changed collection of projects.
When generating an invoice for a project that is included in an Invoice Group, only the information for the Lead Project will appear in various lists (while the details for all projects participating in the Invoice Group will be included in the invoice). See Add Invoices and List Invoices for additional information.
Standalone Project
When designating a project to participate in invoicing as a Standalone Project, the Billing >> Invoice Setup tab will appear as follows.
|
|
Impacts of Changing a Project's Lead / Contributor / Standalone Designation
There are no restrictions with respect to changing the make up of an Invoice Group. You can move projects into and out of a group at any time. When generating an invoice, the current make up of an Invoice Group will be considered. Subsequent changes to the Invoice Group are allowed, but will not be reflected in any existing generated invoices (including draft invoices), that is, the Invoice Group that was in place at the time the invoice was generated will be preserved. See Add Invoices for more information about invoices containing multiple projects.
Note: You cannot change a project lead / standalone / contributor invoicing option if the project has an invoice in the approval queue (applicable to Cloud customers only).
Additional impacts:
Should you modify a Lead Project to become a Standalone or Contributor project, any existing Contributor projects associated with the Lead Project, will be modified to become Standalone Projects.
Should you modify a Contributor Project to become a Lead or Standalone project, the project will no longer be associated with it's former Lead Project.
Note: Should your invoice format include the display of Inception to Date or Invoiced to Date amounts, those values will include totals from all invoices that were associated with a particular Lead Project, even if Contributor Projects were subsequently removed from that Lead's Invoice Group. Should this situation occur, do note that the billed amounts that appear on the Add Invoice screen will be different than the amounts shown on the click-through detail reports (which included all details by project where as the list includes all details by invoice).
Lead Project
When designating a project to participate in invoicing as a Lead Project, the Billing >> Invoice Setup tab will appear as follows. In addition to specifying the value defined above on this tab, you will also use this screen to define the list of current Contributor Projects (for this Invoice Group).

|
|
Contributor Project
When designating a project to participate in invoicing as a Contributor Project, the Billing >> Invoice Setup tab will appear as follows. In addition to specifying the value defined above on this tab, you may also use this screen to associate this Contributor Project to an existing Lead Project.
When a project is designated as a Contributor Project, all fields on the Billing Invoice Setup tabs (except Invoicing Options, Order Number, Description and Memo) become disabled and have their values defaulted from the Lead Project’s Invoice settings.

|
|
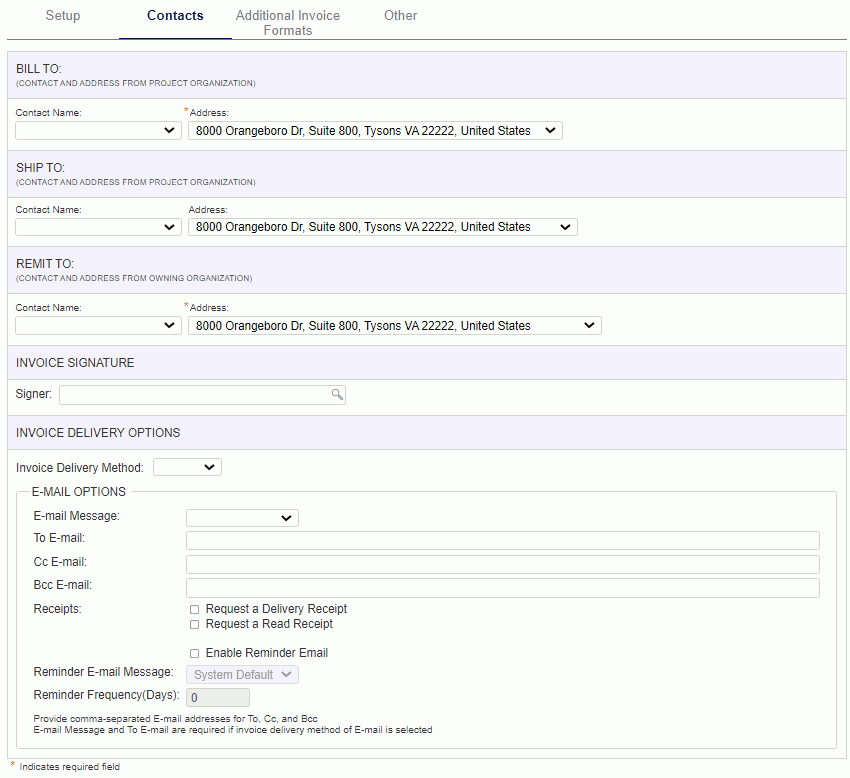
The Contacts tab includes several required fields where you can designate the Bill To and Remit To addresses for an invoice. You can optionally supply a Ship To address. Default values for these contacts and addresses can be established at the Organization level. These selections can be overridden on an invoice by invoice basis when adding or editing an invoice.
Using this screen, you can configure the default Invoice Delivery Options, to include printing or emailing of invoices. This setting can be overridden when processing invoices, but can be used to help with bulk invoice management.
When a project is designated as a Contributor Project, all fields on this tab become disabled and have their values defaulted from the Lead Project's Invoice settings.
|
|
Address Formatting
Addresses may be displayed in single-line or multi-line formats as described below:
Note that whether the Organization Name will appear in the address can be controlled using the following properties:
-- Hide Owning Org on Remit To Address (unanet.invoice.hide.remit_to.org_name)
-- Hide Project Org on Bill To Address (unanet.invoice.hide.bill_to.org_name)
-- Hide Project Org on Ship To Address (unanet.invoice.hide.ship_to.org_name).
Invoice - Additional Invoice Formats
When configuring the Invoice Setup, you are required to specify a Primary Invoice Format (on the Setup tab). On this tab, you can optionally specify one to many additional formats. When specifying additional formats, the invoice generation process will generate multiple invoices for them all at once. Each invoice will be generated from the same base data and will therefore reflect the same Remit To bottom line amount, however, depending on how the various formats are configured (via the Admin >> Setup >> Invoice Formats screen) will contain varying levels of detail.
When printing an invoice for a project (or Invoice Group) that has multiple Invoice Formats specified, the system will include a browser page break in between each distinct invoice format. That is, each format will begin at the top of a new page.
Any changes to the list of Additional Invoice Formats (or the ordering of the additional formats) will have no impact to any existing draft or completed invoices and will only affect the layout of future invoices.
When a project is designated as a Contributor Project, all fields on this tab become disabled and have their values defaulted from the Lead Project's Invoice settings.
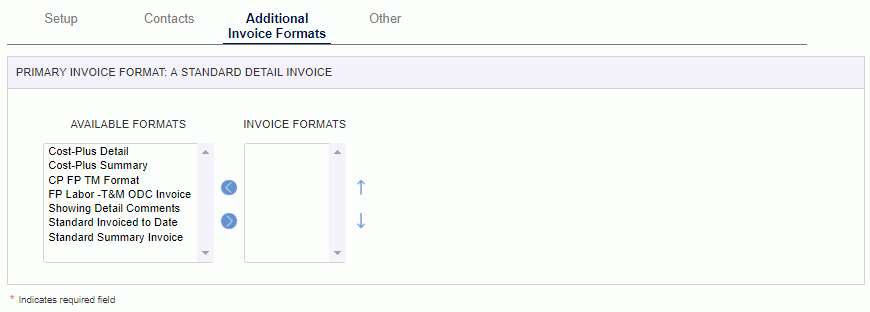
The list of Available Formats will include all formats (as defined on the Admin >> Setup >> Invoice Formats screen).
The fields on the Other tab provide for the option of specifying additional information that will appear in the header and footer of the invoice.
Note that whether the Billing Through Date will appear in the invoice header can be controlled system wide using the following property:
-- Hide Billing Through Date (unanet.invoice.hide.billing_through_date)
When a project is designated as a Contributor Project, all fields on this tab (except Order Number, Description and Memo) become disabled and have their values defaulted from the Lead’s Invoice settings. Order Number is allowed to remain blank even if the Show Order Number check box has been defaulted as checked from the Lead’s settings.

|
|
This screen is available for Billing Managers to enter Pre-Bill Labor entries for a project. You can think of a Pre-Bill Labor entry as having billed the customer in advance for labor that will be performed (ie may be thought of as pre-billed). Pre-Billed Labor will be displayed on an invoice as a credit offsetting any new labor charges. The labor charges will be itemized on the invoice, with the Pre-Billed Labor displayed as an off-setting credit. The remaining balance of a Pre-Billed Labor amount will also be displayed. Note that this balance does not take into account any amounts received from the customer but simply the remaining Pre-Billed Labor amount less any credits that have been issue on this or previous invoices.
Pre-Billed Labor amounts are not permitted on projects having a billing type of CP, NB or null.
Under normal circumstances, a Pre-Billed Labor entry would be added, posted and included on an invoice sent to a customer. Once payment had been received, work would commence. Subsequent labor charges would then be used to retire the Pre-Billed Labor amount and not billed to the customer separately. Only labor charges to project/tasks having a billing type of TM will be used to retire a Pre-Billed Labor balance (that is, other Fixed Price Items, One-Time Charges, Expenses, etc. will not be impacted by the existence of a Pre-Billed Labor amount).
Should a Pre-Billed Labor entry be entered on a project and posted along with labor actuals for that same project, the post processing logic will process the Pre-Billed Labor entry first and attempt to use the labor actuals to retire the Pre-Billed Labor amount and thus not separately bill for those actuals. Note that the Billing Date is critical in this scenario and should pre-date any labor actuals if they are intended to be used to retire the Pre-Billed Labor. Should labor actuals be entered and posted prior to a Pre-Billed Labor entry, those actuals would not be used to retire any Pre-Billed Labor amount and would be included on an invoice.
Note that the Billing Manager cannot modify or remove a Pre-Billed Labor entry that has been included in a post.
See Billing >> Post for more information about the post process and how Pre-Billed Labor entries are handled.

|
|
|